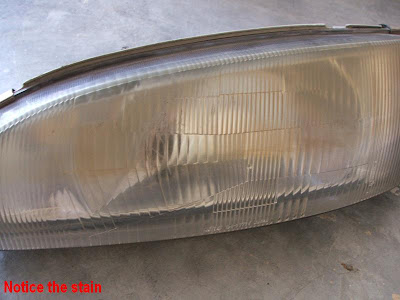
The detailing that I did was getting rid of the oxidation(yellowish stain) on the headlights. This is very typical with the plastic headlights on some JDM models, especially as they start to get really fucken old.
- Brand new car polish towels.
- 2 small pails (do not mix clean and dirty water).
- Autosol plastic cleaner.
- 1 piece of 400 grit and 1 piece of 1000 grit sandpaper.
- Soft99 Polish.
- Used clean kitchen towels.
- Turtle carwash shampoo.
- Used shopping plastic bags.
Step By Step
1) Cover the back portion of the headlights with some used shopping plastic bag and tape it with a masking tape.2) Wash the headlights with the carwash shampoo. Should take you 10 minutes to wash and clean.
3) Use the kitchen towels to dry the headlights.
4) Use the Autosol plastic cleaner and polish towels to scrub and remove any residue that might still be around. You do not have to you force to do this. Just be gentle and use some technique. Should take another 10 minutes to do this.
5) Tear both 400 and 1000 grit sandpaper for each headlights. Then tear again into set of 4 or 6 small pieces. First of all you should soak your sandpaper for at least a 10 minutes before using it in the clean water pail. Always put the used sandpaper in the dirty water pail. Always sand in the same direction vertically or horizontally. This will help to prevent overlapping scratches and give you better results when you polish out the scratches.
6) Start with the 400 grit. You will notice all the yellow stain starts to come off. Keep doing it until no more yellow stain. If you have a nice uniform cloudiness with no hint of the yellowing from earlier proceed to the next step. If not keep sanding. Next use the 1000 grit and sand them evenly. Wipe away residue with a damp towel and check your progress. Should
take you 30mins to 1hour for this process depending on the oxidation.
7) Dry the surface completely. Since i did not use any machine to sand my headlight, i also did not use any machine to buff my headlights. The Soft99 polish is cheap and amazing. It took me 6-8 rounds of polish for each headlight to shine like new. You will feel slightly sore on your arms. Polish until the lens is clear from cloudiness. This will take another 45mins to 1 hour.
8) Wrap it up with plastic and wait until the car is done with the repaint job.
Notes
- I did not use any branded materials and MeGuiar's products since this is a cheap DIY project which costed me less than RM30.00 plus some things i can find at home.
- I did not use any machine like Black & Decker, Makita or etc to sand or buff my headlights. I would love to have one for XMas present tho :)
- I did not soak my sandpaper for 1 hour according to some DIY tips as i have done this before on the DA6 headlights many moons ago.
- This DIY will take you 2-3 hours depending on your personal time. It will take more time if the headlight is big or the oxidation is bad after 20 years sleeping in the wrecker's yard.
- You do not have to be strong as Bruce Lee to use brute force during sanding and polishing. It takes time and technique for God sake.
- If you are lazy, just send to the shop and they will do it for you for RM1XX.
- If you have lotsa money or mommy decides to buy for you, just get brand new.


